Sunday, September 9, 2012

DIY Side-Swept Bangs

The first time I played with scissors, it did not end well.  However, seeing that my last 5-6 stylists have all managed to mangle up my bangs anyway, I decided I didn't have anything to lose.  End result was pretty fly if I do say so myself.  

In this city, there are no hand-outs, and booking an appointment just for a bang trim (and getting charged an arm and leg) just makes me want to bang my head against the wall.  To avoid the hassle of commuting and overpaying for a literally 2-minute trim, I decided to give it another go and share what I've learned from my second time around the block.


Step 1:  Start with damp hair and comb as much hair as you'd like to incorporate into your bangs to the front of your face.  For this look to work, you'll want a fairly thick fringe.  I just jumped out of the shower and towel-dried my hair.  If your hair is wet, you can also spray it down.  Don't worry if you look a little wratchet.  (I look like that creepy chick from "The Grudge.")


Step 2:  Tie or clip back everything you don't want included in your bangs.  Here, I've pulled back everything beyond the red line.  I included some side pieces to make sure they blended well into the rest of my hair.  If you're not sure where to start, put on a thin headband and pull back everything behind the headband.


Step 3:  Tuck the two longer pieces at the sides behind your ears.  Comb the remaining hair around your forehead and divide into two horizontal layers.  Clip the bottom layer (in blue below) to the side.  Create more layers if you have heavier or thicker hair.   


Step 4: Grab a sharp pair of scissors.  I used my sewing shears.  Make sure the blades are sharp and in good condition.  You'll want it to cut smoothly and not pinch any of your hair.

Pull the top layer aside at an angle opposite where you usually part your hair.  For instance, I usually brush my bangs to the right, so I pulled my hair to the left. Cut the top layer at a 45 degree angle.  I started around my nose, but you can go shorter based on how long you want your bangs to be.  Do not cut any shorter than your eyes.  (This was a bad mistake I made the first time around.)  You don't have to cut in one smooth stroke.  Use more than one snip if you need to.


Step 5: Comb both layers together and pull to the side opposite where you want your bangs.  Make another 45 degree angle cut right beneath your first cut.


Step 6: Wet your hair down just a little so you can see where the ends fall.  You can see the nice angle I've cut into the hair.  If your bangs are still too long after making your initial cuts, just repeat steps 3-5 and re-cut your layers shorter and shorter until they are the length you want.  If you're unsure how long/short you need to go to get the nice side-swept look, cut it at a longer length and slowly trim more.

Holding your scissors almost vertically to your hair, cut little triangles out of the bottom so that you have shorter and longer pieces.  You don't want a blunt cut.  The triangles will blend your hair smoothly together. 

Pull the longer side pieces back out from behind your ears.  If it doesn't blend into your bangs, cut them at an angle starting from your shoulders toward your nose.  Cut the same triangles into the bottom.  I didn't need to do this since my hair is already layered in the back, but you may need to if you have a long, blunt haircut.


Step 7:  When you're done, blow dry your hair with a round vented brush.  Wrap your hair around the brush in the opposite direction you want your hair to curl.  This seems counter intuitive, but it'll give your bangs lift and volume.


Step 8:  Gently sweep your hair to the side and brush it into place.  The volumized curls you put in with the dryer should help your direct your hair.  Spray on extra-hold hairspray if needed.  Voila!

Friday, September 7, 2012

Cherry Pies: Good Things Come in Small Packages


I love cherry pie, but always have the tendency to overeat. One slice always leads to another. On the other hand, if I only take one, my gluttony compels me to simply cut a larger piece the size of a pizza slice, which is equally bad. 

The perfect solution? Cupcake pies! (Or personal pan pies.) When you reach for more than one, your guilt trip tells you "you've eaten a whole pie" and keeps your taste buds in check.


 I live in New York City and have a full time job, so am fairly busy and am sure a lot of other folks out there are as well. When I created this blog, I made a promise to myself to not post any recipes that took me more than an hour of combined prep and cook time. Being busy shouldn't limit the fantastic foods one can be eating, and I'm hoping by posting my ideas and experiences, I can help other folks live to eat and not eat to live.

Ingredients for 6 mini pies:
-12 oz of cherry pie filling (Make your own by purchasing sour cherries and marinating in a mixture of corn syrup, corn starch, and red food coloring. This obviously takes longer though.)
- 1/2 lime (or to taste)
-1 1/4 to 1 1/2 c flour (not the self-rising kind)
-1 stick unsalted butter
-optional tiny pinch salt (Yes, it seems counter-intuitive to use unsalted butter then add salt, but this way, you can control the salt content. I add less salt than what is in salted butter - just a tad to cut through the sweetness.)
-1/4 c ICE cold water (or melt a couple ice cubes in a shot of water)
-couple pinches of raw sugar (FYI - raw sugar is grainy and looks like brown sea salt for those of you who are looking for this but have never used it before) or couple pinches of powdered sugar


Step 1: Add the lime juice to your cherry filling.  Set aside while you work on the crust.

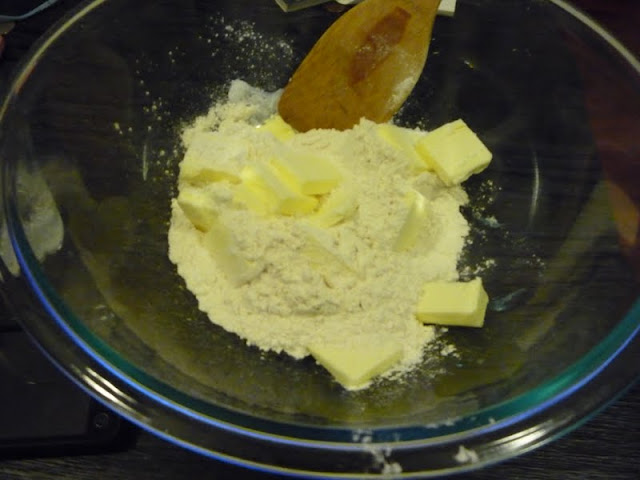
Step 2: In a large glass bowl, add the flour and salt.  Cut in the butter in while it's still cold.  If it's melted, stiffen your butter back up on the fridge.  The key to getting the texture just right it so cold ingredients.


Use a wooden spatula to work the butter into the flour.  If you don't have a wooden spatula, you can use some other firm utensil with a straight edge.  This will help you cut up the butter and work it into a dough.  Do NOT use an electric mixer.  You will end up overworking the dough and it will not bake correctly.

Step 3: Add the ice cold water gradually a teaspoon at a time until you get what looks like pizza dough. You'll know you're done mixing when the butter has been completely crumbled into the flour and there no dry patches.  It's ok if the butter is still a little chunky in spots.  This makes the crust nice and flaky.


Step 4: Divide your dough into thirds.  Two thirds will be used for the bottom crusts.  The remaining third will be used for the lattice work on the top. Gently pinch 2/3 of your dough into 6 equally sized balls. Flatten out each ball and line your muffin tin with the crust.  It doesn't have to be perfect.  You can pinch excess dough off like clay and add to spots that are thin.  The butter will meld everything together if you have some patchy areas.

Step 5: Once you have your tins lined, use a large spoon to fill each "cupcake" with cherry filling.  Add as much or as little as you like.


Step 6: Roll out the remaining third of your dough and cut out small strips of crust with a knife.  This will be used to form the lattice for the upper crust.  Place two strips of crust across each muffin top.  Cut out 2 additional strips and alternately weave them over and under the two strips you've placed across each muffin top.   (Fun Fact: The wealthy are referred to as the "upper crust" because in medieval times when prices for flour soared, only the rich could afford to top their pies with an extra upper crust.) 

Repeat until all your muffin tins are fulled with delectable little pies.  Aren't they darling?

Step 7: Bake at 350 degrees for 35-40 min.  You'll know they're done when the crust is a nice golden brown and the cherry filling is hot and bubbly.


Step 8: Wait for your pies to cool.  They'll lift fairly easily out of the tin with the help of a fork.  I've never buttered my tins, and the butter in the dough is usually enough to get it to easily pop out.


 Enjoy!  I like mine with fresh berries and whipped cream.

How did your petite pies turn out?  Let me know!

Le Bernardin, the Beginning of New Epoch

What has....Four New York Times stars.  Three Michelin stars.  Two James Beard chefs in the house...


 Yes, ladies and gentlemen.  It's the ONE and only: LE BERNARDIN.  This weekend marked the beginning of a new epoch: my epic graduation from gluttony to gastronomy.  Throughout the entire course of dinner, I must've had 5 sets of flatware changes (some utensilsl I didn't even recognize), they swapped out the butter when it softened, and just about every course was accompanied by "French gibberish" sauce that was plated table side.


 Amuse bouche trio:  tuna tartar, salmon and dill, watermelon gazpacho.  I could totally taste oyster sauce in the tartar.  Tiny precursors of the delights to come.  French with a refreshing Asian twist.


I decided to save the drama for your mama and got a simple assortment of fresh oysters on the half shell w/ a dual of house cocktail sauces to start.


Layers of Thinly Pounded Yellowfin Tuna, Foie Gras and Toasted Baguette Shaved Chives and Extra Virgin Olive Oil. I love carpaccio and I love sashimi.  Needless to say, this was love at first bite.  A delightful surprise: finding the crunchy fried foie gras at the bottom.


 What's a little bright and buttery, slightly acidic, and kinda rough around the edges?  Nope, not me.  It's Wild Striped Bass Tartare; Baby Fennel, Crispy Artichoke, Black Olive Oil and Lemon.


 Fluke "Sashimi"; Micro Watercress, Avocado, Jalapeño-Lime Broth.  Very well conceived.  I love the bite from the jalapenos.  As Paris Hilton would say, "That's HOT."


 Ultra Rare Seared Tuna; Marinated Fennel, Basil and Capers.  This plate is a teleportation device to Barcelona.  The unexpected, rustic smokiness takes me back to Spain, a country who does seafood poignantly well.


 “Ultra-Rare” Arctic Char; Truffled Peas and Favas Butter Lettuce-Tarragon Emulsion.  Hands down the best dish of the night.  When diners and critics alike describe fish as "buttery," I have the tendency to call shenanigans.  When you pan fry fish in butter or broil it (the 2 most conventional modes of preparation), it flakes; it's not aptly described as buttery. This however, was a different story.  I'm guessing they pressure sealed this to "cook" it in some sort of emulsion.  End result is creamy and permeated with flavor.  I can't believe it's not butter!


 Since it's my birthday, I was immediately drawn to Baked Lobster; Stuffed Zucchini Flower, Sake-Miso Sauce. 


Surprisingly pedestrian.  Maybe I was expecting too much, but this was largely underwhelming.  The lobster tail had stiffened up from being cooked too long and it lacked flavor, even with the moat of sauce.


 Curry Crusted Cobia; Roasted Pepper Vinaigrette, Coconut Lime Broth.  Meaty and creamy. If Thai yellow curry had a prettier, gentler sister, this would be it.


 Crispy Black Bass; Roasted Shishitos and Acorn Squash “Ceviche”, Peruvian Chicha Sauce.  Exceptional preparation, but I didn't understand how shishitos and squash go together.


 Barely Cooked Wild Salmon; Asparagus, Wasabi-Bean Purée, Yuzu Emulsion. I'm guessing it was caviar in the sauce.  This was as close to American as Eric Ripert gets.


 Me, skip dessert?  Of course not, that would be sinful.


 Banana bread, Caramel Sauce, Chocolate Mousse, Vietnamese Cinnamon Ice Cream. Eric Ripert draws inspiration from my mother's motherland.


 Madagascan Chocolate Ganache, Peanut Mousse, Salted Caramel Ice Cream.  Taste bud workout: Savory, sweet, salty, sour, bitter.


 Madagascan Chocolate Ganache, Peanut Mousse, Salted Caramel Ice Cream.  The Queen of England's Reese's peanut butter cup.


Your typical complimentary palate cleansers.  Banana bread, macaroon, apricot pate, and a chocolate bonbon of some sort.  So much better than a peppermint.

What dining experiences have you had that changed the way you thought about food?